HubSpot Email Marketing Guide
Try ZeroBounce to elevate your HubSpot email marketing
Are you struggling with bounced emails and low open rates? Our step-by-step guide to running successful email campaigns, along with reliable tools and best practices, can help you improve your HubSpot email deliverability.
Create a free accountGet 100 free monthly verifications, testing, monitoring and more when you sign up with a business or premium domain

Used by 400,000+ companies worldwide
Why choose HubSpot for email marketing?
An all-in-one marketing and sales platform
HubSpot offers email marketers and sales teams all the tools they need to run their email campaigns from start to finish:
- CRM with unlimited data to improve your email strategy
- Drag-and-drop email design tools
- Acts as your email service provider (ESP)
- Comprehensive analytics and testing features
HubSpot email marketing simplifies everything by letting you build, manage, and react all under one dashboard.
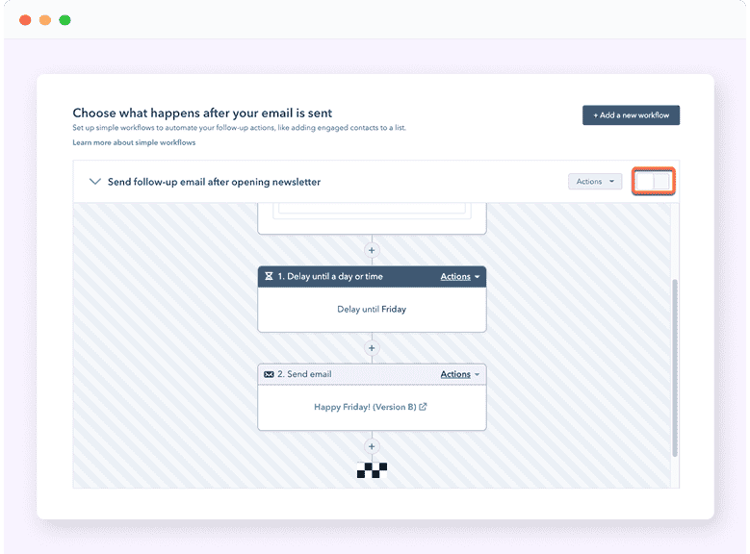
Robust email automation
With Hubspot email automation, even beginners can create and fine-tune email sequences for unique audiences.
Automation alleviates workload and stress by letting you customize actions and email sends based on how your customers interact and respond.
- Create automated sequences for each stage of the customer journey
- Automate actions and emails based on customer behavior (opens, link clicks)
- Adjust your email activity based on critical changes (unsubscribes, spam complaints, bounced emails)
Built-in, user-friendly email design tools
You don’t need developer or designer skills to do email marketing with HubSpot.
With its easy-to-use drag-and-drop editor, you can create attractive, mobile-responsive, and accessible emails in minutes.
- Choose from an extensive library of premade templates
- Customize images, styles, layout, colors, and more
- Save templates or specific sections to reuse
- Update saved sections or footers once to reflect changes across all instances

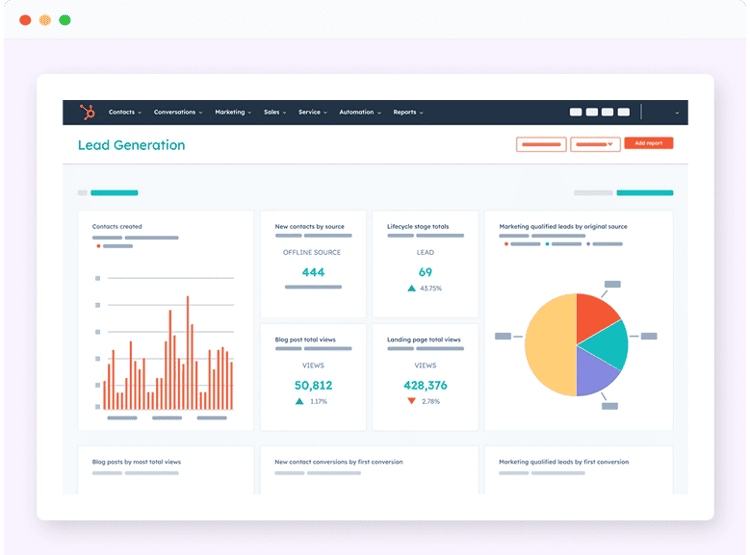
Comprehensive analytics and email testing tools
Insights drive successful email marketing. HubSpot email marketing gives you a wealth of user analytics, including:
- Open, click, and click-through rates
- A heatmap for clicked URLs
- Time spent reading your email
- Deliverability data (delivery rate, bounced emails)
You can filter your analytics by audience, customer, campaign, and more. You can also export your email marketing reports for use on other platforms.
How to run successful HubSpot email campaigns: a step-by-step guide
Ready to maximize your email campaign performance? Here’s how to do email marketing with HubSpot in eight mandatory steps.
Step one: clean your contact lists
Rule number one: you can’t create ROI with email if your emails aren’t delivered.
Here’s the deal: as much as 28% of your email addresses may be invalid. That means those addresses are fake or expired, and your email is going to hard bounce. Too many hard bounces (around 3% or higher) create HubSpot email deliverability issues.
Here’s how you can fix it:
- Get an email verification tool
- Select a contact list to clean
ZeroBounce is a HubSpot-certified app that you can integrate with your HubSpot CRM and Marketing account.
Using the app, you can verify all of your HubSpot contact lists or specific lists. You can also use Contact Monitoring/Auto Validation to automatically verify every new email address you add to the list.
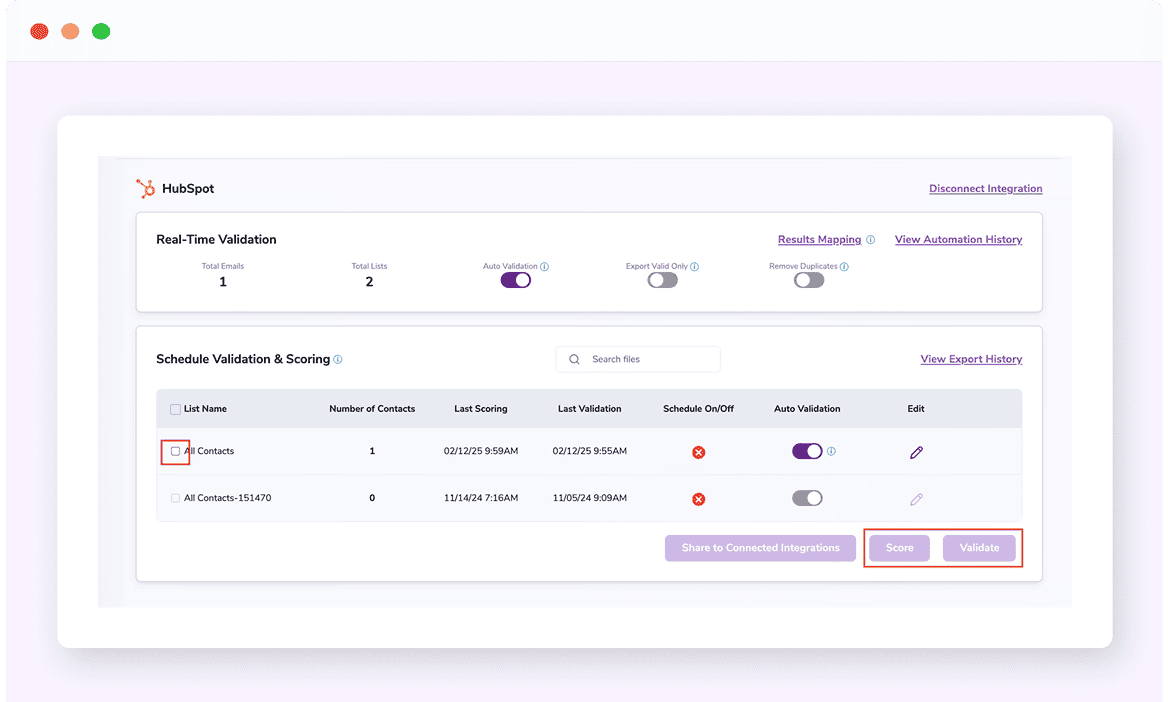
- Delete any invalid email addresses
Removing invalid emails from your list will reduce bounce rates, boost inbox placement, and give your future emails the best chance of success.
Want to test ZeroBounce’s verifier?
Create a free account and try it today!
Try ZeroBounce FreeGet 100 free monthly email verifications when you sign up with a business/premium domain.

Step two: set a goal or objective
Effective email marketing always has a specific goal and intention. Blasting generic emails to customers is a thing of the past, and it's more likely to earn spam complaints than sales.
When planning your next email, ask yourself these questions:
- What do I want to achieve with this email? – Build brand awareness, draw traffic to your website, share relevant education, boost promotion sales, etc.
- Who would find this email relevant? – Not every person on your list is the same. Consider their familiarity with your company, stage of the buyer journey, and other attributes that can help you create a customer persona.
- What are my metrics for success? – Attribution for email marketing isn’t easy. That’s why you should define your performance goals first. For example, you’ll want link clicks when promoting a free eBook, but in this lead nurturing step, expecting a boom in sales isn’t realistic.
- How can I increase my chances of success? – Now you have a game plan. Take notes of what you want to emphasize or highlight in your email. Always emphasize the customer, not yourself, to help them understand why this email benefits their interests, needs, and pain points.
Step three: write and design your email
Now that you’ve laid the groundwork, it’s time to create.
There’s no wrong way to create HubSpot email templates, and you start with two options:
- Use an existing template as-is and add copy
- Customize HubSpot templates to fit your company and goals
If you’re new to HubSpot email marketing, we recommend experimenting with HubSpot’s drag-and-drop editor. First, it will familiarize you with the platform. Second, you’ll be able to customize and tailor your emails to be unique as opposed to using the same template that other companies are using.
Here are some step-by-step tips to help you get started:
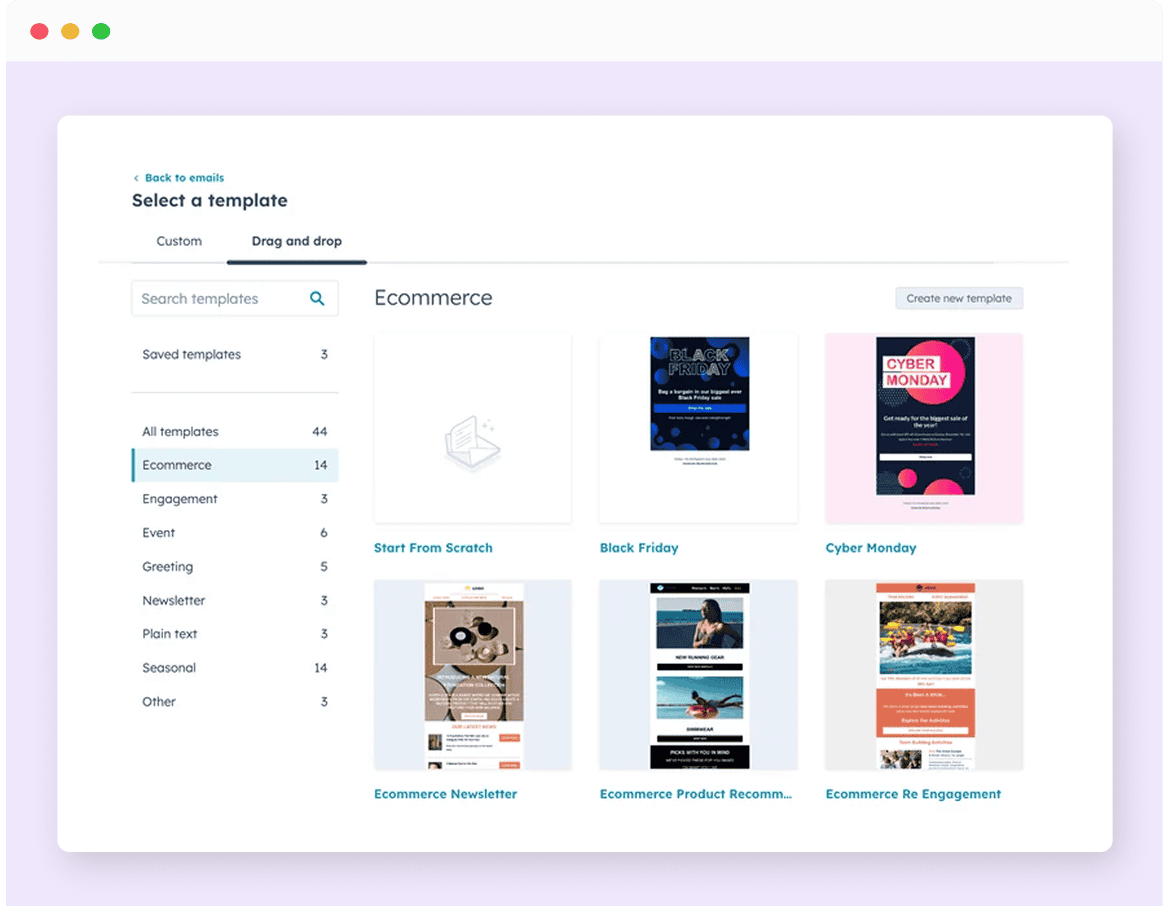
- On the left, select a template category. You can start browsing by matching your business type or by selecting a specific type or style.
- Once you find a template, click ‘Choose template’ to begin editing.
- The HubSpot email editor is made up of two sections:
The content and design editor is on the left. Here, you can select widgets or layouts to drag and drop on the right side.
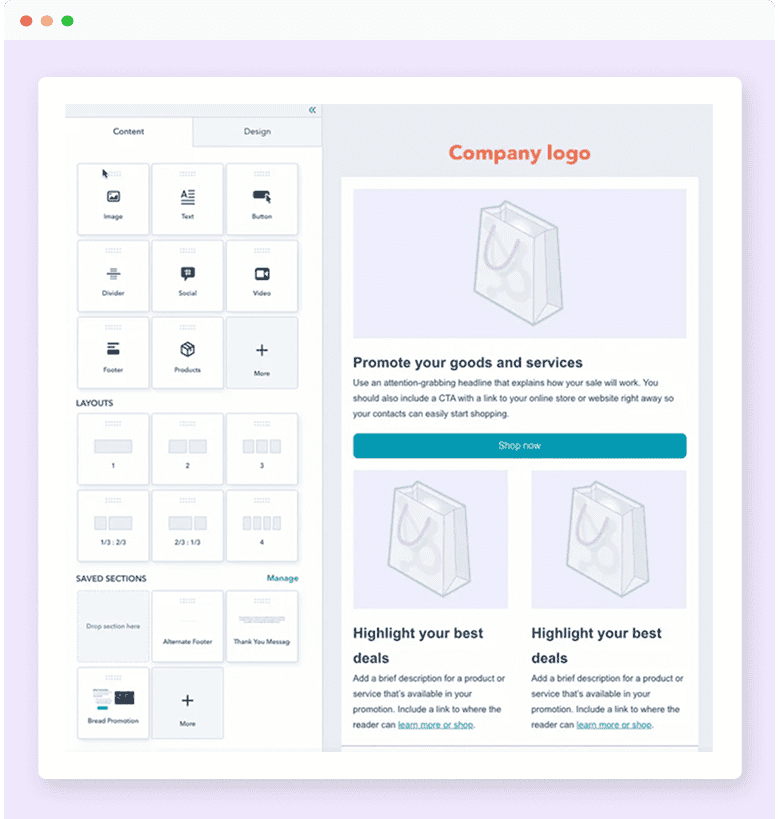
The existing template is on the right. If you hover over any element or section, you can drag and drop, edit, or delete it.
To move a specific element, hover over and drag it to the right spot. If you want to move an entire section, hover over the left until a blue edge appears. Click and drag this edge to move the section to where you prefer.
- Design your email and write your copy.
While we can’t write the perfect email for you, there are some HubSpot email practices you should keep in mind:
- Make your main call-to-action (CTA) or offer above the fold. It should be the first thing the reader sees when opening the email without the need to scroll.
- Use HubSpot’s personalized fields where applicable.
Because HubSpot email marketing connects directly to your CRM, you can automatically fill useful details for every instance of the email, such as name, details about any related deals in your pipeline, or customer support tickets.
With an Enterprise account, you can also create customized personalization fields as you become more familiar with the builder.
- Ensure that your company logo is clearly visible and prominent. Doing this helps the reader identify the sender and builds trust that your email isn’t spam.
- Edit the footer as needed to include required marketing details, such as office location, contact information, and legal information. You might also include a widget for social profiles and other locations that your readers can contact you.
- Always include an unsubscribe link. With HubSpot email marketing, a user preferences/unsubscribe link is included by default.
- Keep it concise. Focus on these details: what is the purpose of the email, who are you addressing, and why will following through on the CTA benefit the reader? Avoid adding numerous links and CTAs to avoid noise and decision paralysis.
- Choose a color palette that makes all text prominent and legible. For example, use a light background when using dark text.
- Include alternative text for all images. This is a short description of the image that will appear if the reader’s device fails to load the file.
Step four: edit your sender information
Accurate sender information is valuable for two reasons. First, it allows the reader to identify who sent them the message. Second, it provides a clear and direct way to continue conversations if the recipient chooses to reply.
Here’s how to customize your email’s sender information from the editor’s settings:
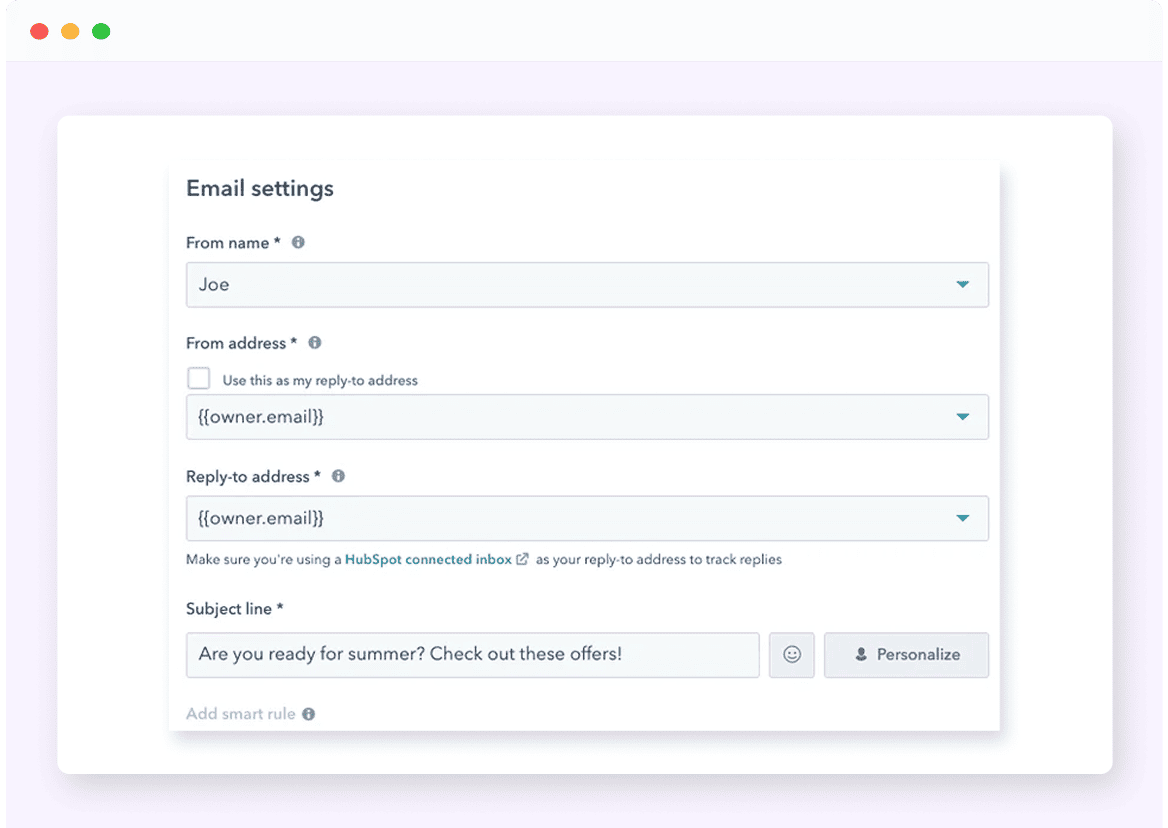
- From name – This is the name that appears first next to your message in the inbox. By default, you’ll want to use your company name. However, it can also be useful to experiment with this listing direct points of contact, e.g., Joe from Company, or the rep’s exact name.
- From address – This is the email address that will appear as the actual sender in the email header. You can use the default email address associated with your HubSpot account or select a point of contact from the business listed in your CRM.
Using different email addresses can be useful for further filtering and targeting your email messaging. For example, your business might use ‘newsletter@company.com’ for its weekly newsletter but may opt to use a different email for different use cases.
- Reply-to address – By default, the reply-to address will match the from address. However, it may be beneficial in some cases to direct all email replies to a dedicated email address like ‘support@company.com’ to assist with managing incoming inquiries.
- Subscription type – Lastly, you can also categorize your new email based on pre-defined types that you’ve created. You can differentiate emails by any attribute, such as newsletter, promotions, customer service, announcements, etc.
HubSpot’s subscription type feature is instrumental for segmenting your audience, which allows for superior targeting and results. We’ll tackle segmentation later in our best practices.
Step five: test your email
After creating your email, you’ll want to troubleshoot it for any potential mistakes or errors. You can do this by clicking the ‘Preview’ button in the top-right corner of the editor.
On this screen, you’ll see a version of your email as it will appear in the recipient’s inbox, including the final design and generated personalization options. You can also use the menu at the top to select different devices and screen types to test your mobile readiness and optimization.
While the initial preview is useful, it may not tell the whole story of how an email is rendered in an actual inbox. That’s where the test feature comes in.
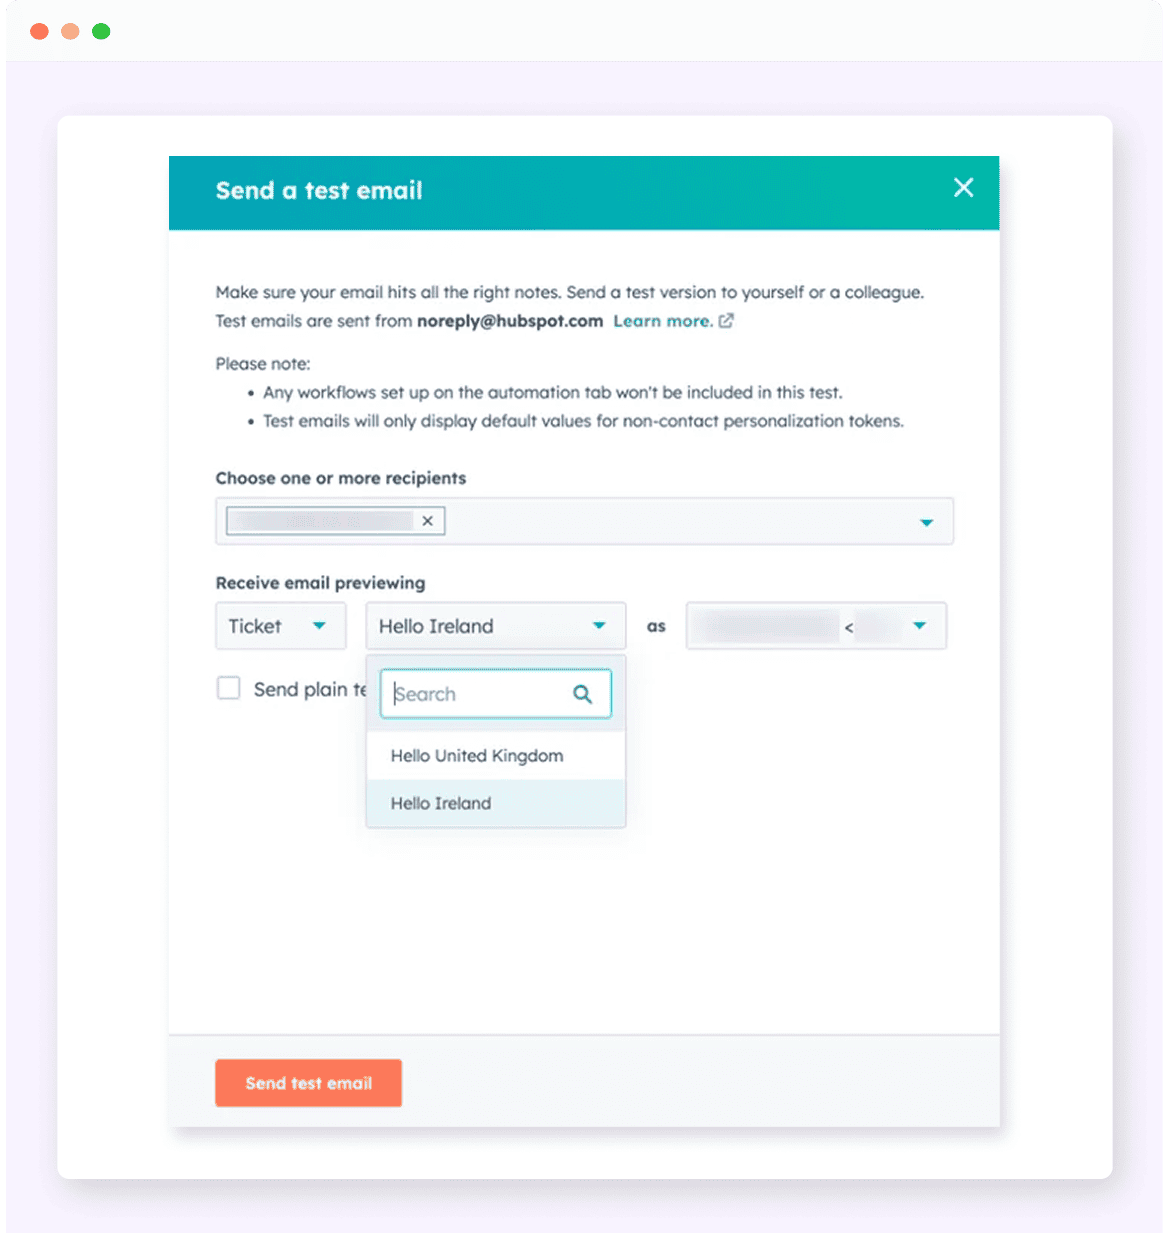
Use the menu to select ‘send a test email’ and enter the inbox you’d like to use for the test. HubSpot will send off a single instance of your email, so that you can preview it in a live environment using different email service providers.
If you detect any issues with your email, revert to step three as necessary.
Step six: choose your audience
If you completed the first five steps, this one will be quick. When ready, hit ‘Review and send’ in the top-right corner.
Under recipients, you’ll have two fields:
- Send to – This is the contact or list that will receive the email. You can select contact lists from your CRM or search for individual contacts.
- Don’t send to – If necessary, you can specify any contacts that shouldn’t receive the email. This is useful if you wish to pause or delay communications with any contacts on your lists for any reason.
- Don’t send to unengaged contacts – Checking this box is useful if you want to maximize opens and clicks. However, it is only beneficial if you have an established sending history and relevant user engagement data. If the user isn’t interested, you can easily remove them from the recipient list.
Step seven: select an optimal send time
On the same screen, you’ll have two options: send now or schedule for later.
If you want to send now, check the option and verify by clicking ‘Send’ once more. However, right now might not be the optimal time for the best results.
Here’s a tough truth – there’s no optimal send time that works for every business or business type. Instead, this is another area that you require testing and observation in order to achieve the best results. Not only will it vary based on the audience, but the differences in B2B and B2C audience behaviors will also play a significant role.
However, there are some tips regarding send time and frequency we can recommend:
- Choose a consistent sending frequency – Sending too many emails feels like spam to the reader. Sticking to a regular schedule has been shown to benefit engagement and improve HubSpot email deliverability.
- Avoid drastic changes to your sending – If you’re looking to ramp up your email game and send to more people, great! However, you need to do it gradually through a process called email warmupⓘUn servicio que ayuda a los remitentes de correo electrónico a mejorar su dominio de correo y reputación de IP mediante el envío de contenido de correo electrónico genuino a direcciones de correo electrónico predeterminadas. Los usuarios aumentan gradualmente el volumen de correos electrónicos enviados y reciben interacción positiva a través de un proceso automatizado. to avoid deliverability issues that will quickly push your emails to the spam folder.
Step eight: Learn from the results
Finally, your HubSpot email marketing culminates with the data you receive after your email is sent. Here’s how you can track your analytics:
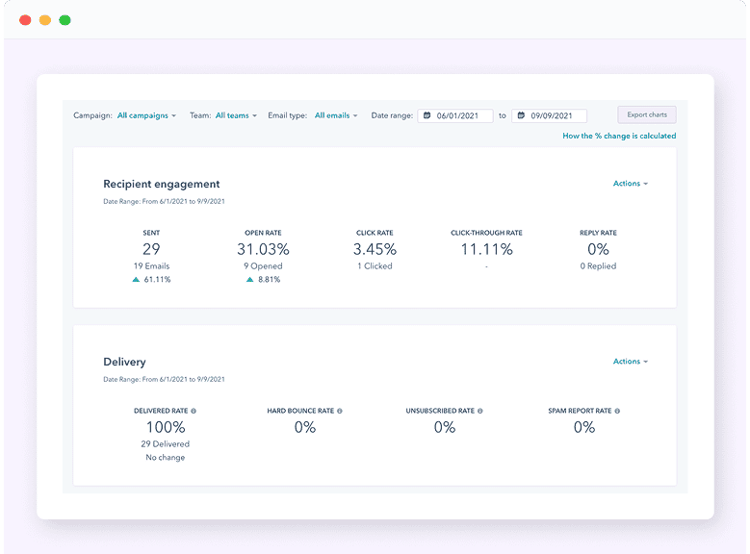
How to check overall HubSpot email performance
- Go to the Marketing Hub and select the email dashboard.
- Here, you’ll find a wealth of email performance data broken down by sections:
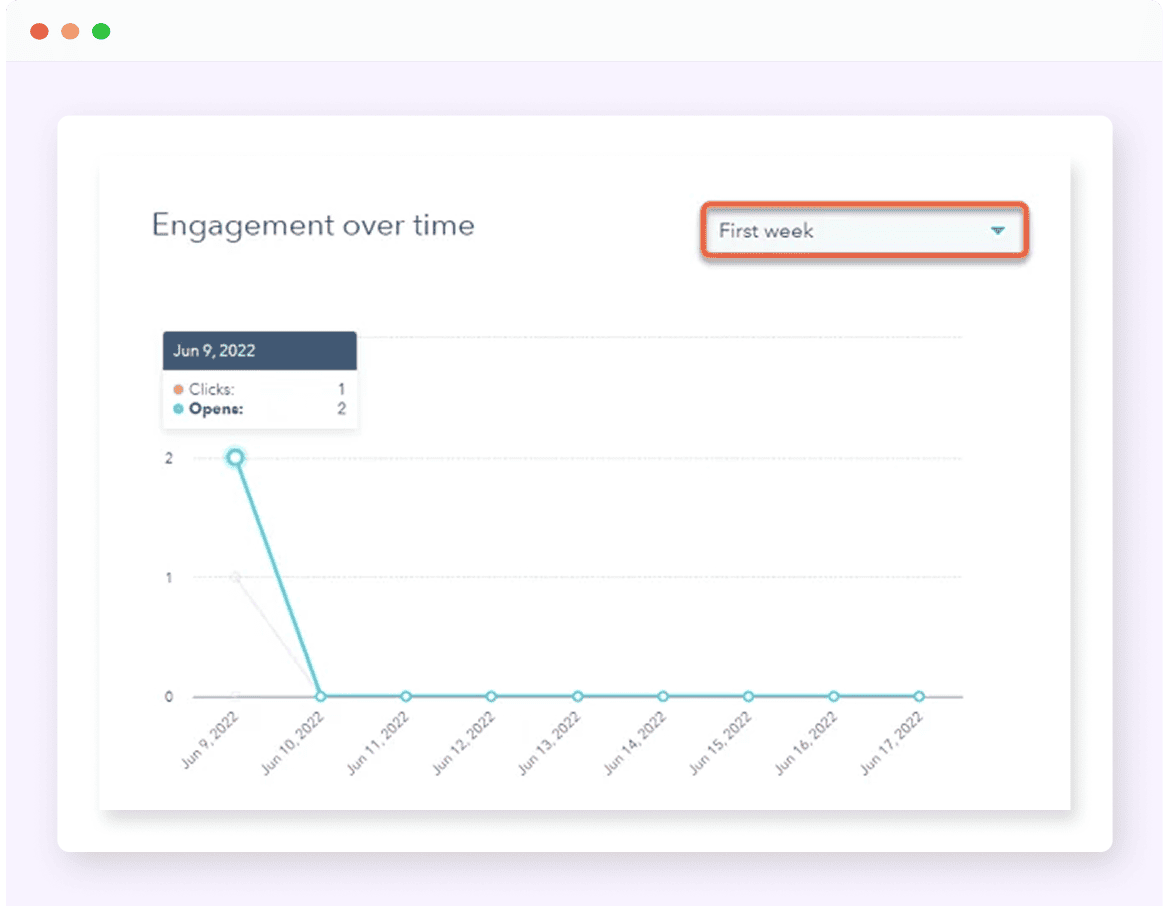
Recipient engagement – This section includes the most commonly-tracked metrics, such as open rate, click rate, and click-through rate. The benchmarks for these vary from B2B to B2C and also by industry type.
Delivery – This section tracks delivery and deliverability data, such as your delivery rate, bounce rate, and spam report rate. These metrics are essential to track as they are the most easily accessible data points that can alert you to inbox placement and sender reputation issues.
There are also different reporting options, including customizing the date range of your campaigns. You can also chart your overall performance to compare open quickly and clickthrough rates over time.
How to check individual campaign performance
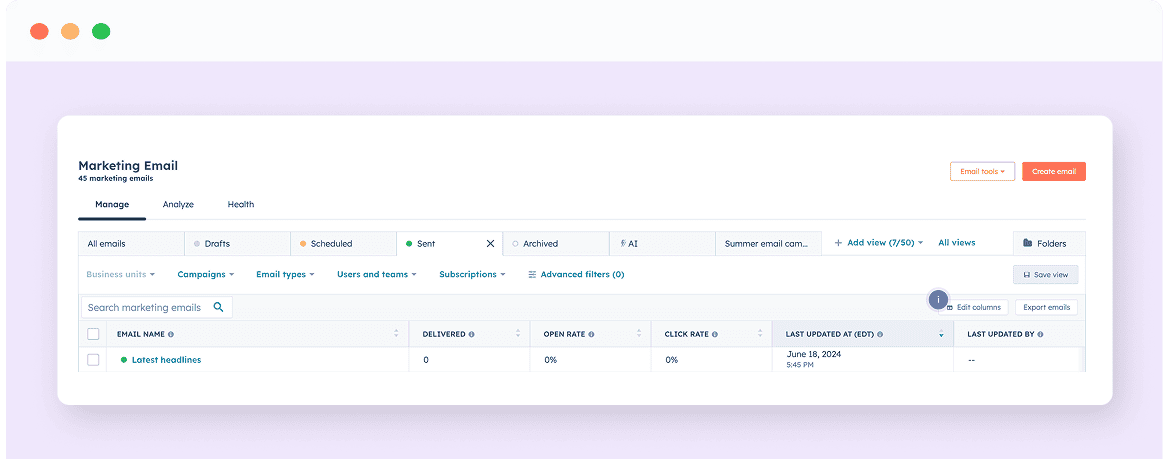
- Go to Marketing > Marketing Email.
- Click on the campaign you want to view.
- Two tabs contain email analytics: Performance and Recipients.
Performance – This tab includes user engagement data and deliverability results. In addition to the metrics provided in the overall reporting, it provides enhanced insights, such as an HTML click map and a list of your top engaged contacts.
Recipients – This tab lists specific contact data, so that you can organize who received, opened, and clicked on your email.
How to use your email marketing performance data
Email analytics are critical for two reasons. First, they will let you know that your emails have actually been delivered. Second, it’s your primary guide as to what’s working and what isn’t.
Here are some useful questions to ask when reviewing your latest campaign:
- Did my contacts open my email? – Low open rates can be attributed to various factors, including delivery issues, inbox placement and reputation problems, or an uninteresting, misleading subject line.
- Did my contacts click any links inside the email? – Your email should offer something of value to the reader. Conversely, good open rates but a poor clickthrough rate indicate an issue. Try experimenting with link placement or revisiting your copy to ensure that your reader has a compelling reason to click.
Pro-tip: Use HubSpot’s HTML click map feature to track the specific areas of your email that perform well. If users are clicking links in that area, stay the course. On the other hand, if you’re not seeing interaction in key areas, consider A/B testing options until results improve.
- Am I getting a lot of unsubscribes? Unsubscribes are normal and healthy. If a user is uninterested, you should remove them from your list.
However, if you’re seeing an unusually high unsubscribe rate, it means that your contacts don’t find the email relevant. Also, be certain you’re only emailing opted-in subscribers. A high unsubscribe rate is a problem that warrants immediate attention. - Are my emails bouncing? – If your engagement isn’t great, your hard bounce rate is the next metric to check. Users can’t open emails if they’re not delivered.
Hard bounces are caused by invalid email addresses on your list. However, it can also indicate issues with your sender reputation.
Pro-tip: HubSpot considers a bounce rate of 5% or above to be high. If your campaigns exceed this, HubSpot will likely notify you or suspend your sending abilities until the issue is resolved.
- Is my send time the issue? – Our email marketing analytics are handy tools, but they don’t reveal everything. Before you discredit your email design and copy, consider that the optimal send time for your audience may be a different day of the week or time.
After you gather these insights and draw possible conclusions, it’s time to revisit the editor. Consider possible revisions you can make to your email design, copy, subject lines, and send times before sending your next campaign.
Reading data and testing is the most essential step to great email marketing, so be prepared to revisit this step frequently for best results.

Best practices for HubSpot email marketing
HubSpot email marketing will require continuous testing and optimization. However, there are best practices you can follow to maximize your performance and ROI from the start. Here are our six must-follow practices.
#1 - Always verify email addresses before you send
Never assume that your contact list is clean. To combat list decay, you should verify your email list quarterly. Additionally, you need to check new email addresses before you add them to your CRM, regardless of the source.
Sticking to this best practice as step number one provides you with these benefits:
- It eliminates hard bounces caused by invalid email addresses
- It helps you avoid spam traps
- HubSpot can identify harmful or high-risk lists. Verifying and refining your data first will prevent unnecessary suspensions.
- It prevents deliverability and reputation issues caused by bounces and poor email campaign performance
- Always remember: data quality over quantity.
#2 - Authenticate your emails and monitor compliance
Major email service providers like Google, Yahoo, and Microsoft require mass senders to authenticate their emails. If you’re unfamiliar, email authentication records secure your emails, protect your customers, and help ESPs recognize you as the email’s trusted owner and sender.
You can manage your email authentication in HubSpot by connecting your sending domain. It’s encouraged to configure the following before sending
- Sender Policy Framework (SPF) – This record contains a list of trusted IP addresses approved to send from your email domain.
- DomainKeys Identified Mail (DKIM) – This record adds a unique encrypted key to sent emails while granting recipient servers a public key for cross-reference.
- Domain-based Message Authentication, Reporting, and Conformance (DMARC) – This record tells ESPs how to handle emails that fail your SPF or DKIM checks.
- Brand Indicators for Message Identification (BIMI) – This strategy builds user trust by adding a verified company logo to all emails.
Not only does email authentication protect your HubSpot emails, it boosts your reputation and can lead to priority inbox placement.
#3 - Segment your contact lists to optimize targeting and content creation
It’s been proven time and again that segmented email campaigns perform best. In other words, never send an email to your entire CRM, as it is almost never relevant to every user.
Instead, follow our guide on using HubSpot for email marketing above to refine your goals and create segmented audiences. This will improve your ability to match email content with customer intent and make your performance analytics more reliable in the long term.
Pro-tip: A great place to start with segmentation is by breaking down the customer journey in your current pipeline. Establish sequences for prospects, first-time customers, repeat customers, or lapsed ones. By identifying the difference in the situation, you’re already set up to create better-optimized emails that can deliver better results.
#4 - Leverage automation to create unique sequences
Don’t let all those segmented audiences intimidate you. With HubSpot email automation, you’ll only need to create each instance of an email once. Then, you can set those emails to send out to the right recipients once your established triggers are met.
To further improve those sequences, you can use HubSpot’s personalization features to customize the emails for the reader. By refining the email for a smaller, specific audience and adding unique identifiers, you’ve created personalized content that’s easier to measure and will yield superior ROI.
#5 - Test, review, and test again
Many businesses can create and write attractive emails. However, fewer know how to use data to test and improve. Don’t be that sender.
While you’re starting it, it’s useful to monitor metrics to ensure your emails are being delivered successfully. However, before you can start making informed decisions, you’ll need to send more emails and obtain a larger sample size.
To help your HubSpot email campaigns, take advantage of its built-in A/B testing features like this:
- When creating an email in the drag-and-drop editor, click ‘Create A/B test.’ You can find this in Marketing > Marketing Email.
- Your original email is the ‘A’ variation. Name your ‘B’ email and use the editor as normal to create your alternative version. Here are some things to experiment with:
- The CTA placement
- The CTA, offer, or description
- Link placement
- The image(s) used (or use no image at all)
- The ‘from’ name
- Subject line variations
- Next, set the A/B distribution. This figure shows the percentage of emails that will be sent to different contacts. For example, a 50:50 distribution means that 50% of users will receive email A, and 50% of users will receive email B.
- Set a winning metric. You should choose this based on the goal you established for your email. For example, if you’re testing subject line performance, open rate is the best metric to select for this A/B test.
Pro-tip: In addition to regular monitoring and testing, you should audit your entire email program twice a year. This gives you a large sample size to identify trends, potential issues, and areas for improvement. It’ll also help you anticipate potential deliverability issues before they lead to more serious consequences.
#6 - Audit your HubSpot sender reputation
There’s one last component you need to monitor: your email sender reputation. Every sender has one, and it’s what ESPs use to tell the story of your email habits and behaviors. Here’s how you can monitor your email health:
- In HubSpot, check the ‘Email Health’ section. While this doesn’t show your reputation, it’s a great first indicator of potential threats. It will detail your engagement, bounce rate, spam reports, and unsubscribes, all of which impact your sender reputation.
- If you notice issues, or want to perform a regular audit, use Google Postmaster Tools. This free tool will show you:
- Your IP & domain reputation
- Track email authentication compliance
- Shows your compliance with Gmail requirements
It can also provide you with instructions on how to resolve discovered issues.
It’s best practice to maintain a good sender reputation for these reasons:
- It improves your email deliverability and inbox visibility
- It builds trust with email service providers
- It prevents high bounce rates
- It prevents spam folder placement
Additionally, it prevents any interruptions to your HubSpot email marketing program. If you’re using their platform for sending, they’ll hold you accountable for using best email marketing practices.
Ensuring HubSpot email deliverability with ZeroBounce
If you want a sustainable email program, start with the ZeroBounce HubSpot integration. It offers everything you need to improve your inbox visibility without leaving your HubSpot dashboard.
- 99% accurate email verification – Check the validity of your contacts’ email addresses in your HubSpot CRM, both individually and in bulk.
- Compatible with HubSpot Forms – Verify new subscribers before they enter your CRM with the real-time email verification API.
- Monitor new contacts – When you add a new contact to your CRM, ZeroBounce automatically verifies the email address.
- Schedule your next maintenance – Never forget to clean your list again. Enjoy ‘set it and forget it’ convenience by selecting how often you want to clean your database.
- A.I. Email Scoring – Every list will acquire ‘catch-alls,’ which are impossible-to-validate email addresses. Instead, ZeroBounce scores them to help you distinguish which inboxes are active and which you should avoid.
Want to enhance your inbox placement further?
ZeroBounce is every email marketer’s one-stop answer for optimized deliverability. Take your email program to the next level with:
- Warmup – Build up your business’s sending reputation through an automated, ZeroBounce-managed process that rewards your emails with positive engagement signals.
- DMARC Monitoring – Let ZeroBounce manage email authentication for you, eliminating the complexity. Set up DMARC, track unlimited emails, and receive automated notifications of any misalignment or suspicious activity.
- Inbox placement testing – Test every email before you send it. The free tester assesses your email’s performance against 20+ popular ESPs to let you know if you’re headed to the inbox or spam.
Elevate your HubSpot email marketing game with ZeroBounce
Bookmark this step-by-step guide to ensure your team gets the knowledge it needs to maximize email deliverability and improve your HubSpot email open rates.
And, by creating a free ZeroBounce account now, we can assist you along the way.
Create your free account now to get:
Access to the
HubSpot integration
100 monthly email verification credits
1 monthly Inbox
placement test
1 monthly Email
server test
10 monthly Email Finder queries
API access
Contenidos
- Why choose HubSpot for email marketing? para encontrar más detalles sobre los enlaces
- How to run successful HubSpot email campaigns: a step-by-step guide para encontrar más detalles sobre los enlaces
- Best practices for HubSpot email marketing para encontrar más detalles sobre los enlaces
- Ensuring HubSpot email deliverability with ZeroBounce para encontrar más detalles sobre los enlaces
- Elevate your HubSpot email marketing game with ZeroBounce para encontrar más detalles sobre los enlaces


Frequently asked questions
You can create an email marketing program using HubSpot’s CRM and Marketing Hub, which allows you to create audiences and segments to use as mailing lists seamlessly. From the Marketing dashboard, go to Email, and start creating new emails using a template or the drag-and-drop editor. You can also track performance via your dashboard.
You can try HubSpot email marketing with its free plan. The free tier gives two seats and access to tools like CRM, Forms, 20 landing pages, up to 2,000 email sends monthly, meeting scheduling, and live chat. However, free emails and landing pages contain HubSpot branding.
Poor HubSpot email deliverability and a low sender reputation can cause your emails to go to spam. To improve your deliverability, follow these best practices: verify your contacts, implement email authentication, warm up your domain, and follow a consistent sending schedule. Doing these will help you avoid bounces and improve your engagement rates over time.
To improve your open rates, check your email bounce rate to ensure your emails are being delivered. If you’re experiencing delivery and deliverability issues, you need to investigate your list hygiene and reputation. Additionally, use clear and direct subject lines to avoid looking like spam. You can also use HubSpot’s A/B testing tool to compare different subject lines and set open rate as your winning KPI.