BIMI Generator Tool - Create BIMI Records
Enter your information into the required fields. Automatically generate your record and enjoy email brand enhancement with BIMI!
Need help with the BIMI record generator? Jump down to our how-to-guide, which includes BIMI logo specifications and requirements!
Try it now →
BIMI Generator


What is a BIMI generator?
The free BIMI generator automates BIMI record setup for busy email marketers like you. You provide us with the required BIMI elements, and we’ll provide you with a record that adheres to BIMI compliance and setup standards.
What is BIMI?
Brand Indicators for Message Identification (BIMI) allows a business to select and present a company logo next to their email messages.
Secure email branding with BIMI improves the visual look of your email content, enhances customer trust, offers email authentication improvements, and improves email deliverabilityⓘA sender’s ability to reach the recipient’s inbox with their outgoing emails. It may also describe the ratio of emails delivered to the inbox vs. those sent to spam or blocked by the receiving server..
After creating your new record, you can easily add your new BIMI record to your domain’s DNS records to improve your company’s visual identity in emails.

Benefits of using the BIMI generator
The BIMI record generator is your helper in implementing BIMI for brand visibility.
Create your record today and benefit from the following:
✓ BIMI for email marketing
✓ Visual identity in emails
✓ Ensuring BIMI compliance
✓ Secure email branding and email authentication improvements
BIMI helps both service providers and customers verify that your emails are legitimate.
Create BIMI recordsHow to use the BIMI generator
To create your records successfully, follow this handy BIMI record creation guide:
Enter Your Domain Name
This domain is the same one that your company uses to send emails (e.g., zerobounce.net).
Logo location (SVG URL)
Provide the URL where your logo image is hosted. BIMI setup best practices require you to use the SVG format.
For more details on image requirements, jump down to BIMI logo specifications.
VMC Location (optional)
Provide a URL that points to your logo’s Verified Mark Certificate (VMC).
Be advised - Not all email service providers require a VMC, but some do (e.g., Gmail). It’s strongly recommended that you include a VMC to verify that you own the logo’s trademark.

BIMI logo specifications
The company logo image file you choose is the most critical part of your BIMI record. You’ll need to ensure yours is up to BIMI standards in order for the image to display correctly.
- ✓ Must be a square image
- ✓ 1:1 aspect ratio
- ✓ Minimum height and width: 96 pixels
- ✓ Must use exact pixels - no relative dimensions
- ✓ 32 KB file size or smaller
- ✓ Recommended - solid color background
- ✓ No external links or scripts
- ✓ Contains a title tag
- ✓ File format: SVG Tiny PS
It’s recommended that a tool like Adobe Illustrator be used to create or edit an existing logo to be BIMI-compatible. The BIMI Group also details recommended SVG conversion tools for creating your BIMI image file.
Create BIMI records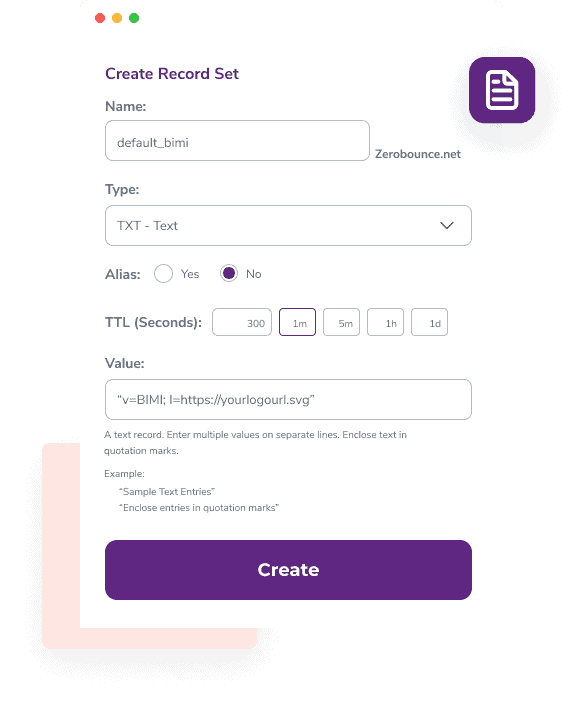
Implementing BIMI for brand visibility
To implement your BIMI record, save your generated record as a .TXT file. This file is what you’ll use to add to your DNS records with your email domain provider.
All providers are different, so be sure to investigate the best practices for implementing BIMI within the DNS record management settings. Chances are that the process will look something like this:
1. In your DNS settings, click “Create a new record” or something equivalent.
2. Add your TXT file, and be sure to select the matching ‘Type.’
3. Create and publish your BIMI record.
Be mindful that DNS changes may take up to 24 hours to propagate.
Troubleshooting BIMI DNS configuration
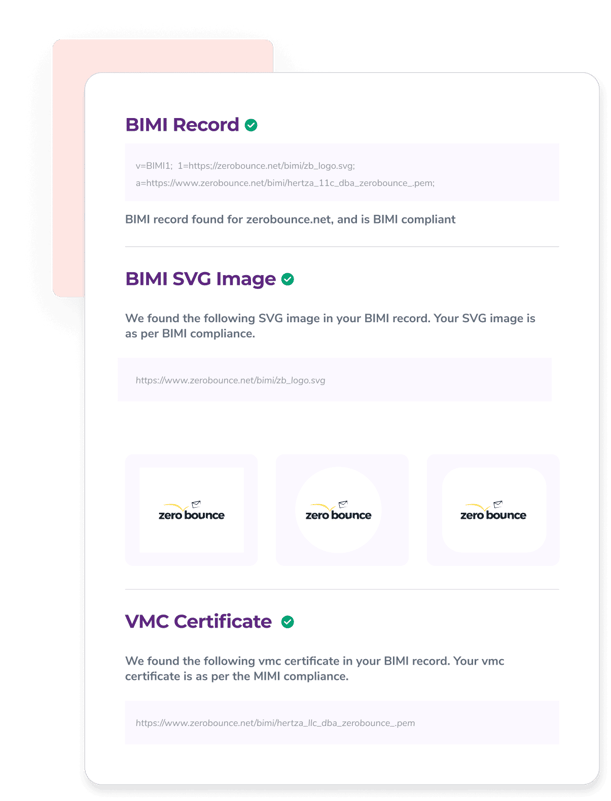
After implementing your BIMI record, it’s strongly recommended to use a BIMI checker to test compatibility and compliance.
A BIMI checker will ensure that:
✓ A BIMI record is present and not in conflict with other BIMI records
✓ The SVG file was found to be compliant with BIMI standards. A preview of your BIMI image will also be rendered.
✓ The VMC was found to verify ownership.
After using the BIMI generator, test your changes with the BIMI checker and identify any existing errors, along with feedback on how to correct them.
Use the BIMI checkerIf your BIMI checker results are up to par, and you’re still experiencing issues, be sure to investigate your other email authentication records in the DNS.
Important note
DMARC email authentication is necessary to use BIMI effectively. More precisely, you must have a DMARC policy set to ‘quarantine’ or ‘reject.’ A ‘none’ policy is not compliant with BIMI standards.
If you need assistance configuring and monitoring your DMARC policy, it’s recommended to use a DMARC MonitorⓘA ZeroBounce service that helps users set up and configure DMARC, also known as Domain-Based Messaging, Authentication, and Conformance, which monitors outgoing emails and assists with email security. Users can actively monitor all outgoing emails sent from their listed domain.. Alternatively, check your existing record with a DMARC checker.
Frequently asked questions
A BIMI generator automates the process of creating Brand Indicators for Message Identification (BIMI) records. The user just needs to enter their domain and provide an image to generate a record. A Verified Mark Certificate (VMC) is also recommended.
To create a BIMI record, you’ll need to provide your email domain and an SVG file that contains your logo. In addition, some email providers (like Gmail) require a VMC, while others do not. It’s recommended that you provide a VMC to ensure your logo displays regardless of the recipient’s mailbox provider.
For BIMI setup best practices, ensure your BIMI logo meets these specifications:
• Must be a square image
• 1:1 aspect ratio
• Minimum height and width: 96 pixels
• Must use exact pixels - no relative dimensions
• 32 KB file size or smaller
• Recommended - solid color background
• No external links or scripts
• Contains a title tag
• File format: SVG Tiny PS
To simplify BIMI logo creation, it’s recommended that any image file be converted to meet BIMI standards using a BIMI conversion tool.
BIMI gives email marketers control over their visual identity in emails. When a BIMI record is found and validated, your logo will display next to your emails when delivered to the subscriber’s inbox.
In addition to this visual, a BIMI branding strategy also offers:
• Email authentication improvements that offer secure email branding
• A visual aid for building trust through email
• Email brand enhancement
• Better brand visibility
To ensure the best results when using BIMI, adhere to these standards:
• Your logo is an SVG file and has the appropriate dimensions and file size
• The image is a square and placed on a solid-color background
• The logo matches your brand
• The logo is appropriately titled to match your company/branding
• Your domain is also authenticated with DMARC
• The DMARC policy is set to ‘quarantine’ or ‘reject’ (‘none’ is not compatible)
• A Verified Mark Certificate (VMC) is present to verify trademark ownership.
To create a scalable vector graphic (SVG), you can use any image design tool that supports the ability to create vector graphics. Examples of such software include Adobe Illustrator and Photoshop, as well as Canva, which has a free version. For BIMI purposes, it’s recommended to use one of the BIMI Group’s recommended conversion tools to ensure that your SVG file meets BIMI requirements.
You can also convert an existing image into an SVG file by using a free online converter found online.